API Documentation
Running an API in Postman is a straightforward process, but it becomes even more useful when you need to include custom headers and a specific JSON request body. In this guide, we'll walk you
"apiKey": "", //Please enter your Api key here
"campaignName": "", //Please enter the live campaign name here
"destination": "", //Please enter the Phone number of the recipient here
"userName": "", // This is optional field and takes name of the recipient
"source": "", //This is optional field and takes the source of this such as web etc
"media": {
"url": "", //If the template is media type include the media URL here which is publicly available
"filename": "" //filename
},
"templateParams": [""], //Template params here. Separate them by , and add them in the array ['param1', 'param2']
"tags": [], // Here you can provide tags to assign to the users
"attributes":
{
"attribute_name": "" //To set attribute values for the users. The attribute should already have been created
}
}

Note: Replace the placeholders (e.g., "Your Campaign Name," "Media URL," etc.) with your actual


2. Launch the Campaign
Fill in the campaign details, including the template you created, and proceed with launching the campaign.
through the steps to run the WABA API using Postman with a sample URL and the headers and
body you provided. Additionally, we'll cover how to make a campaign live as per your instructions.
Prerequisites
Before you begin, make sure you have the following:
1. Postman: Download and install the Postman application if you haven't already. You can get it from https://www.postman.com/downloads/.
2. API Key: Ensure you have the API key that is required for authentication.
3. Access to Campaigns: Make sure you have access to the campaign feature in your system.
Steps to Run the WABA API in Postman
1. Launch Postman
Open the Postman application on your computer.
2. Create a New Request
Click on the "New" button in the top-left corner of the Postman window. Select "Request" from the dropdown menu.
3. Set Request DetailsIn the "Request Name" field, give your request a descriptive name, such as "WABA API Campaign Request." Choose the HTTP method you want to use for your API request. In this case, you can use "POST" since you're sending data to the server.
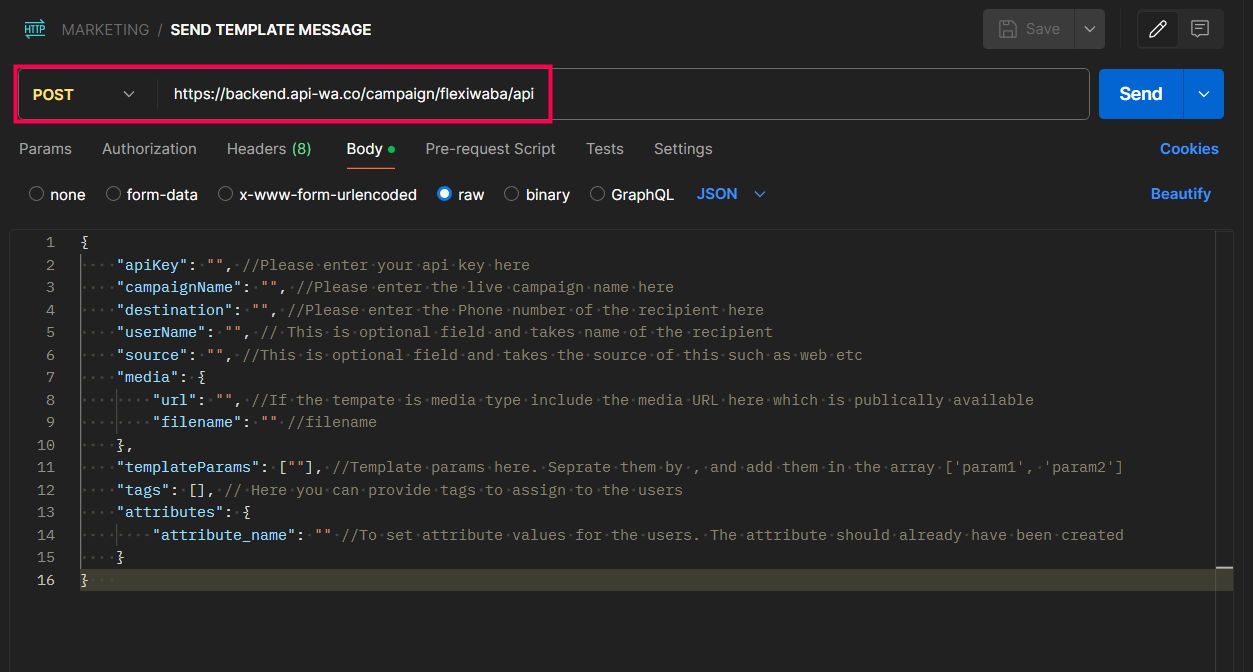
Enter the API URL in the request URL field. You mentioned the following URL:
Enter the API URL in the request URL field. You mentioned the following URL:
4. Set the Request Body
To send the JSON request body, do the following:
To send the JSON request body, do the following:
Click on the "Body" tab.
Select the "raw" option.
In the text area below, you can structure your JSON request body as follows:
{"apiKey": "", //Please enter your Api key here
"campaignName": "", //Please enter the live campaign name here
"destination": "", //Please enter the Phone number of the recipient here
"userName": "", // This is optional field and takes name of the recipient
"source": "", //This is optional field and takes the source of this such as web etc
"media": {
"url": "", //If the template is media type include the media URL here which is publicly available
"filename": "" //filename
},
"templateParams": [""], //Template params here. Separate them by , and add them in the array ['param1', 'param2']
"tags": [], // Here you can provide tags to assign to the users
"attributes":
{
"attribute_name": "" //To set attribute values for the users. The attribute should already have been created
}
}
Note: Replace the placeholders (e.g., "Your Campaign Name," "Media URL," etc.) with your actual
data.
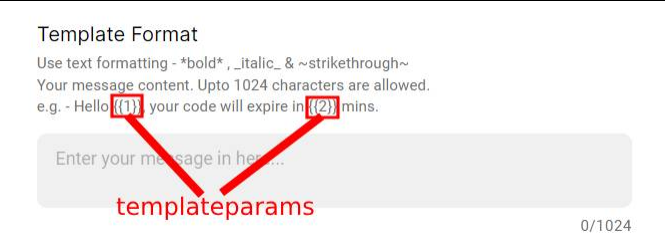
"templateparams", short for template parameters, are dynamic placeholders within your message
templates
5. Send the Request
Now that you've configured the request, click the "Send" button in the top-right corner of the Postman window.
6. View the Response
Postman will send the request to the specified API URL with the custom headers and JSON body. You'll see the API's response in the lower part of the Postman window, which will provide
information about whether the campaign was launched successfully or not.
Making campaign live As per your instructions , to make the campaign live, follow these additional steps:
1. Create a Template
Before launching a campaign, you need to create a message template. Here's how:
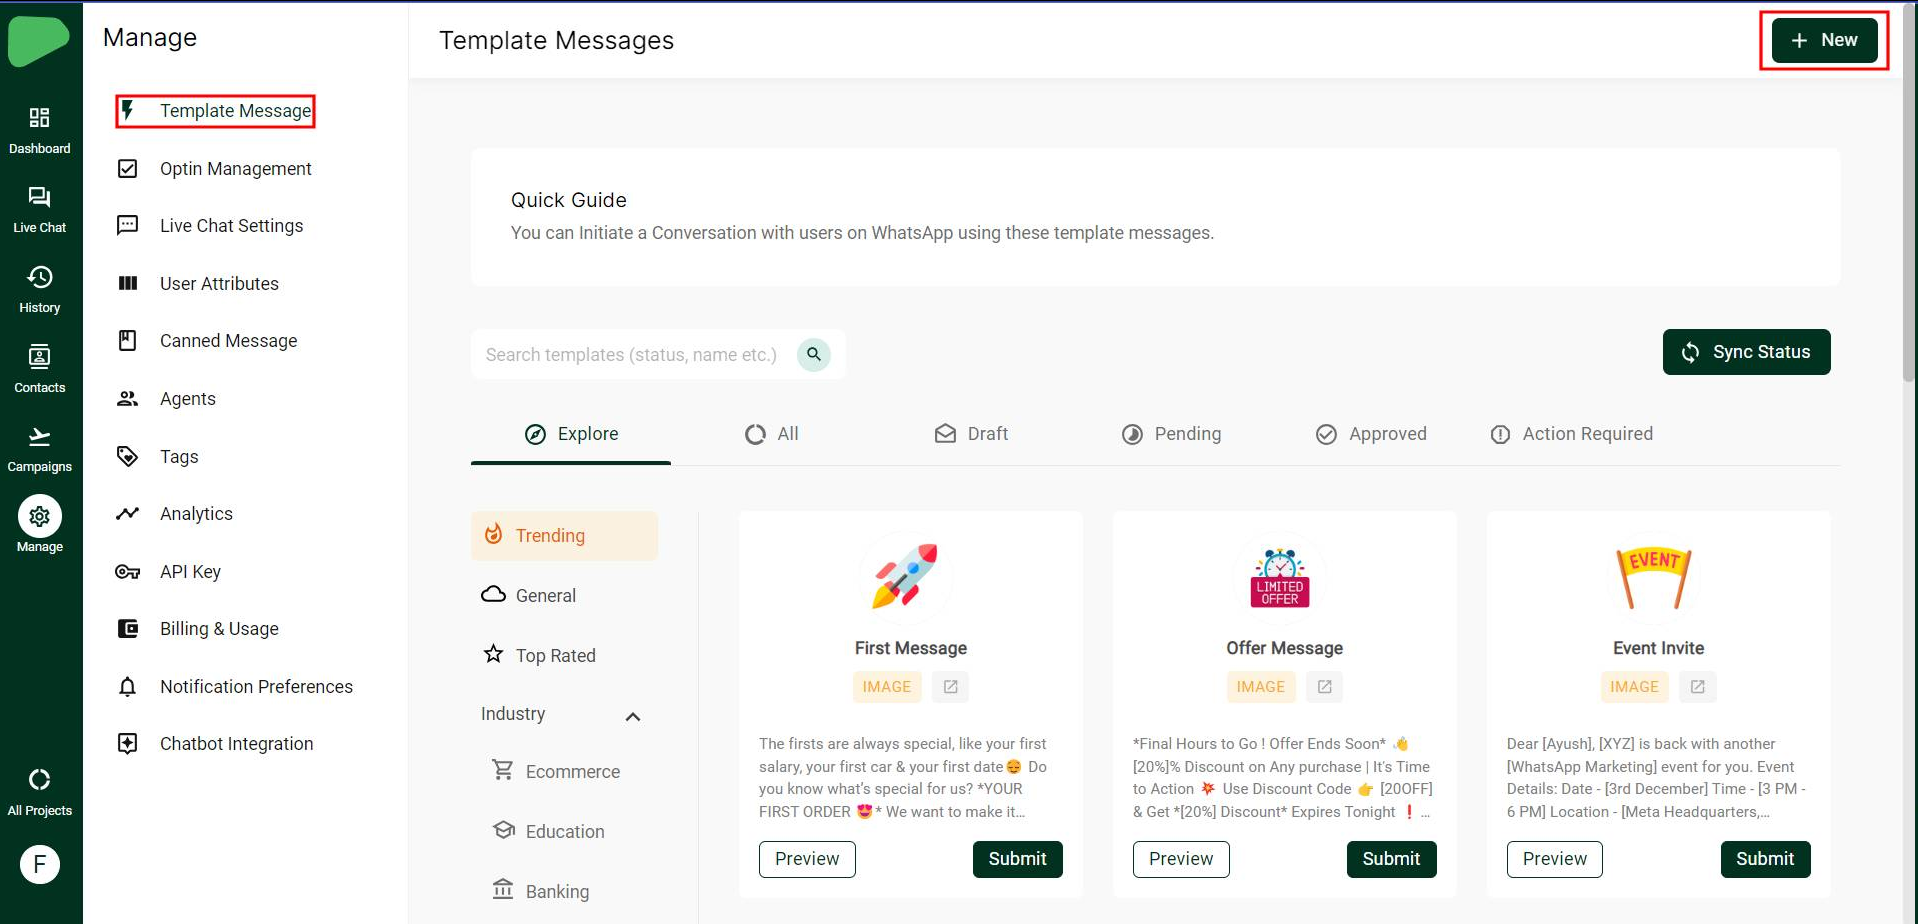
In your system, navigate to the "Template Messages" section. Click on "New" to create a new message template.
Fill in the details of your message template, including the variable placeholders you mentioned (templateParams). Save the template.
2. Launch the Campaign
After creating the template, go to the "Campaigns" section in your system.
Click on "Launch" to start a new campaign.

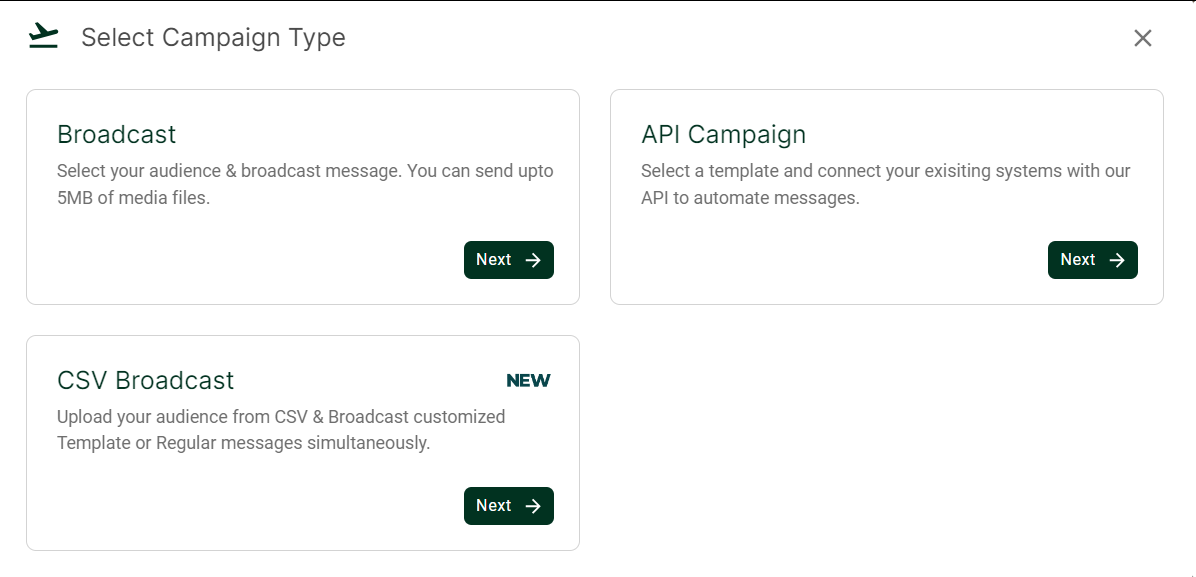
Select "API Campaign" as the campaign type.
Click on "Launch" to start a new campaign.
Select "API Campaign" as the campaign type.
Fill in the campaign details, including the template you created, and proceed with launching the campaign.
That's it! You've successfully run the WABA API request in Postman with custom headers and a
JSON request body, and you've also launched a live campaign using the message template you
created. Remember to ensure that the campaign is live in your system and that you have created
the necessary message template and attributes as described in your notes.
Video Guide:
Video Guide:
Related Articles
STOP-LIGHT DOCUMENTATION for Template API
STOP-LIGHT DOCUMENTATION The released documentation covers how to use APIs to send templates directly from the Marketing panel. POST https://connect.api-wa.co/project-apis/v1/project/{project_id}/messages PARAMETER Project_id : XXX AUTH ...Cloud API Error Codes
The Cloud API is built on the Graph API, so if you are unfamiliar with handling Graph API error responses, see Graph API's error handling documentation. In general, we recommend that you build your app's error handling logic around code values and ...Steps to apply for WhatsApp Business API
The next step to getting started with Alendei Platforms is applying for WhatsApp Business API. You must have a WhatsApp Business API account to get access to WhatsApp Broadcasting & all other Alendei Platforms features. That's why you must apply for ...Steps to apply for WhatsApp Business API
You must have a WhatsApp Business API account to get access to WhatsApp Broadcasting & all other Marketing Platform. That's why you must apply for the WhatsApp Business API. Following are the pre-requisites you must match in order to apply for the ...How to get started with Conversions API
Currently, FlexiWABA offers you to setup CAPI with Click to WhatsApp ads. You need the following to setup the meta conversion API for click-to-WhatsApp ads run via FlexiWABA: 1. An active WhatsApp Business API account powered by FlexiWABA: The first ...