Tickets
OCP is a chat-based platforms. Alot of the times there are issues for which it becomes impossible to fix them within the required open window. The issue may involve cooperation of different departments and hence it's not viable to provide a solution to the bot user instantly.
Hence for this use case, OCP has now introduced Tickets Add-on. Using Tickets, you can create lists of issues and assign them to the users, making it work as an internal ticketing system.
How to Use Tickets
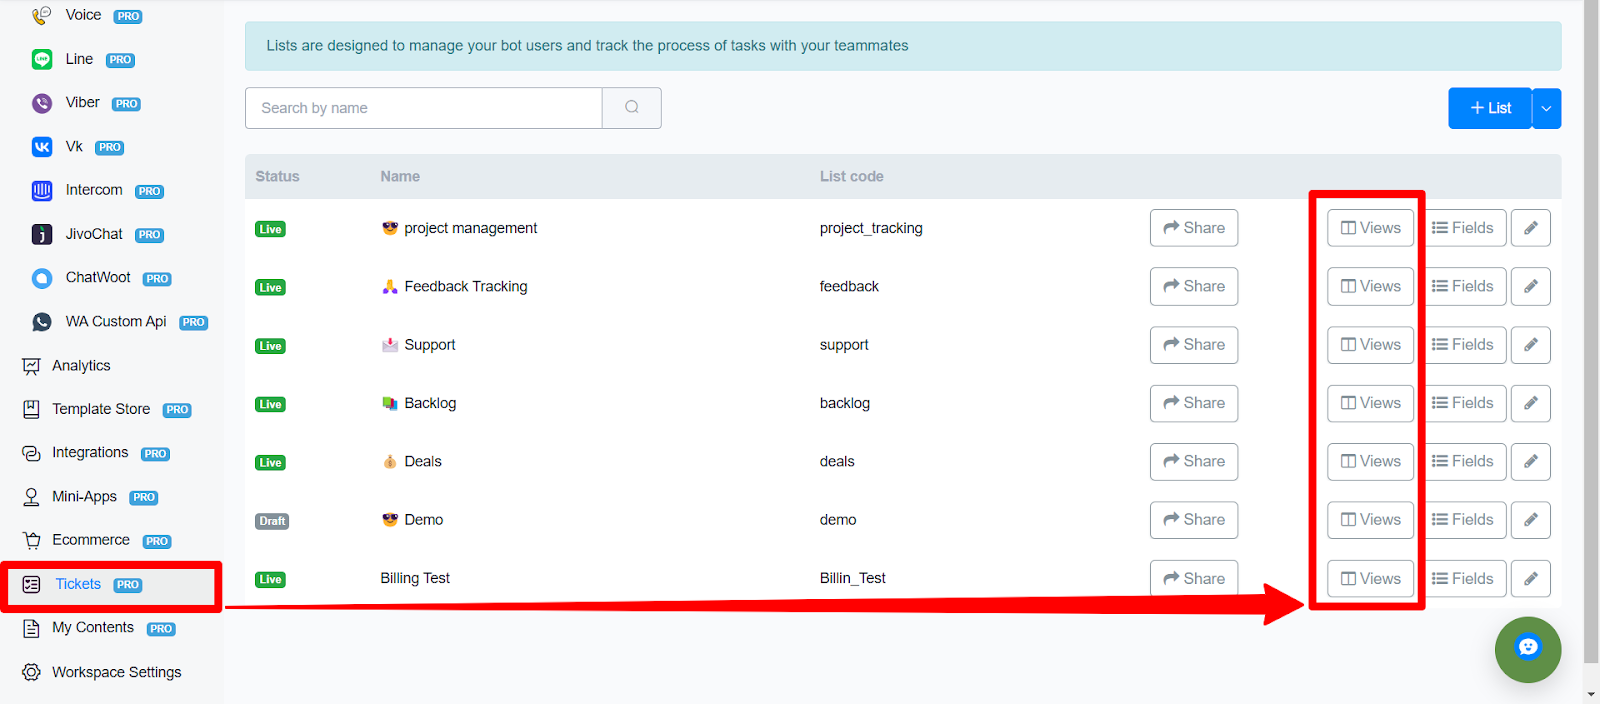
From your workspace’s dashboard, click on workspace settings and click on the Tickets tab.
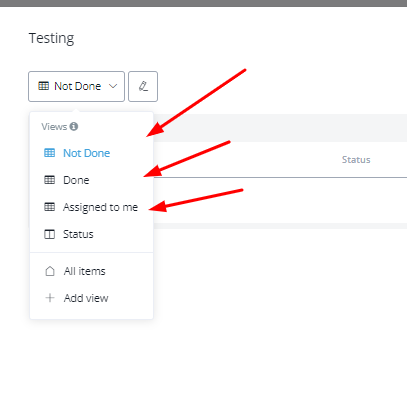
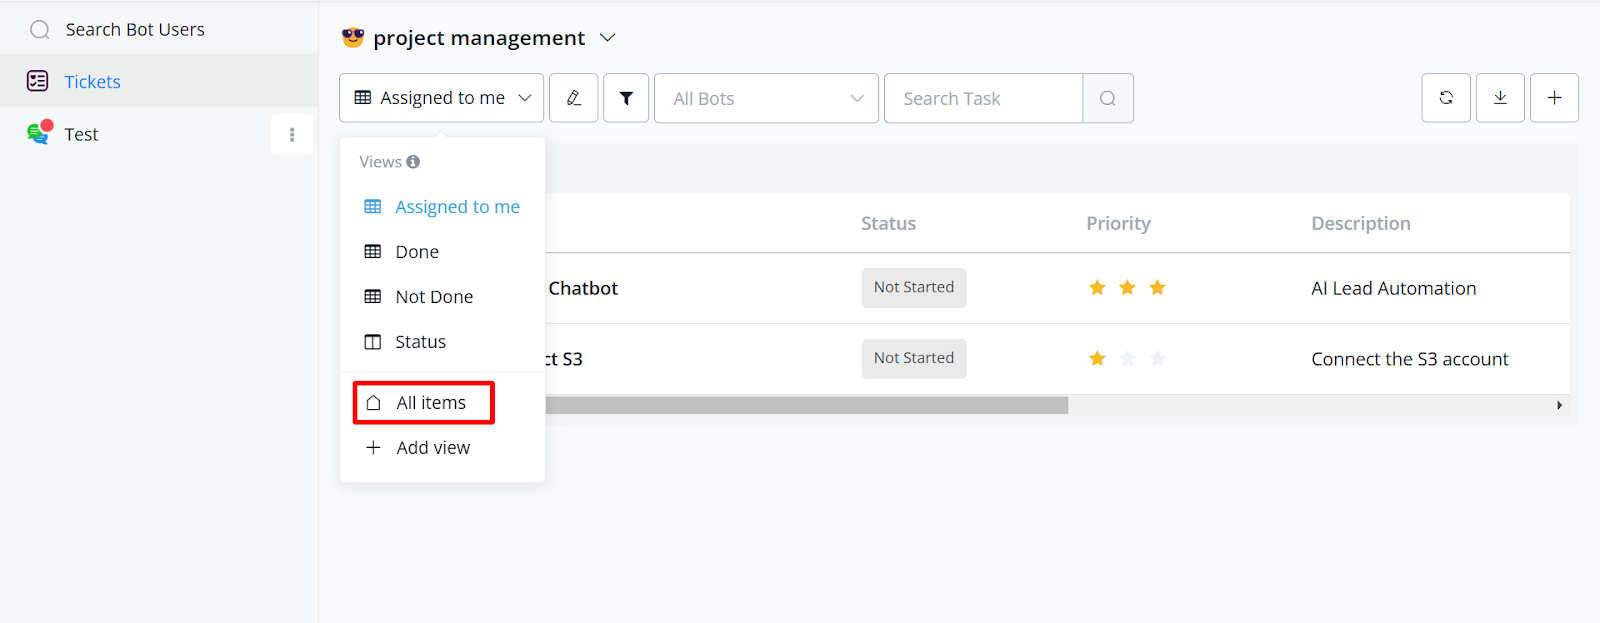
Views
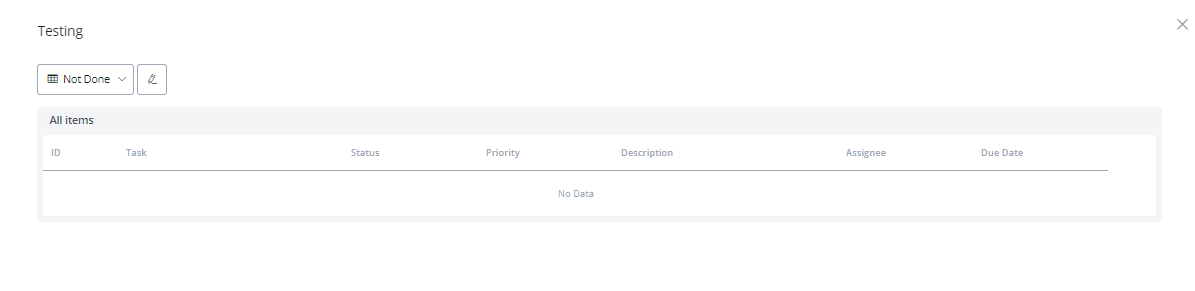 View shows how many items there are currently present in a list. This can amount to the number of tickets currently present in a specific template.
 You can use the preexisting filters to filter the results as well as see all the items by clicking on the “All Items” view.
 You can also create a new view and change the response as per your desired outcome.
You can also filter the items based on their current status. Currently the above shown status is available to be used.
Views Permission for Members
With the new Views Permission feature, owners and admins now have the option to hide certain views in the Tickets section, like the “All Items” view. This allows you to control what your team members see, ensuring only the selected roles have access to all ticket details if needed.
With the new Views Permission feature, owners and admins now have the option to hide certain views in the Tickets section, like the “All Items” view. This allows you to control what your team members see, ensuring only the selected roles have access to all ticket details if needed.
Default View
By default, members can see all available views, including “Assigned to me,” “Done,” “Not Done,” “Status,” and “All Items.” Additionally, you can create more views. This setup gives full visibility and flexibility for members to track and manage tickets as needed.
By default, members can see all available views, including “Assigned to me,” “Done,” “Not Done,” “Status,” and “All Items.” Additionally, you can create more views. This setup gives full visibility and flexibility for members to track and manage tickets as needed.
Custom Chart Titles in the OCP Ticket View
Custom chart titles help make ticket metrics more intuitive by clearly indicating the purpose of each chart. This improves visibility and makes it easier for users to quickly interpret data without needing additional explanations, thus enhancing overall productivity in ticket management.
Step by step guide to configure this feature:
1. Access the Tickets Section
From the OCP Dashboard, navigate to the sidebar and select Tickets.
This will open a list of ticket projects that you manage or track.
From the OCP Dashboard, navigate to the sidebar and select Tickets.
This will open a list of ticket projects that you manage or track.
2. Select Your Project and View
In the Tickets list, locate the project for which you want to set a custom chart title.
Click on Views next to the project name to open the available views.
In the Tickets list, locate the project for which you want to set a custom chart title.
Click on Views next to the project name to open the available views.
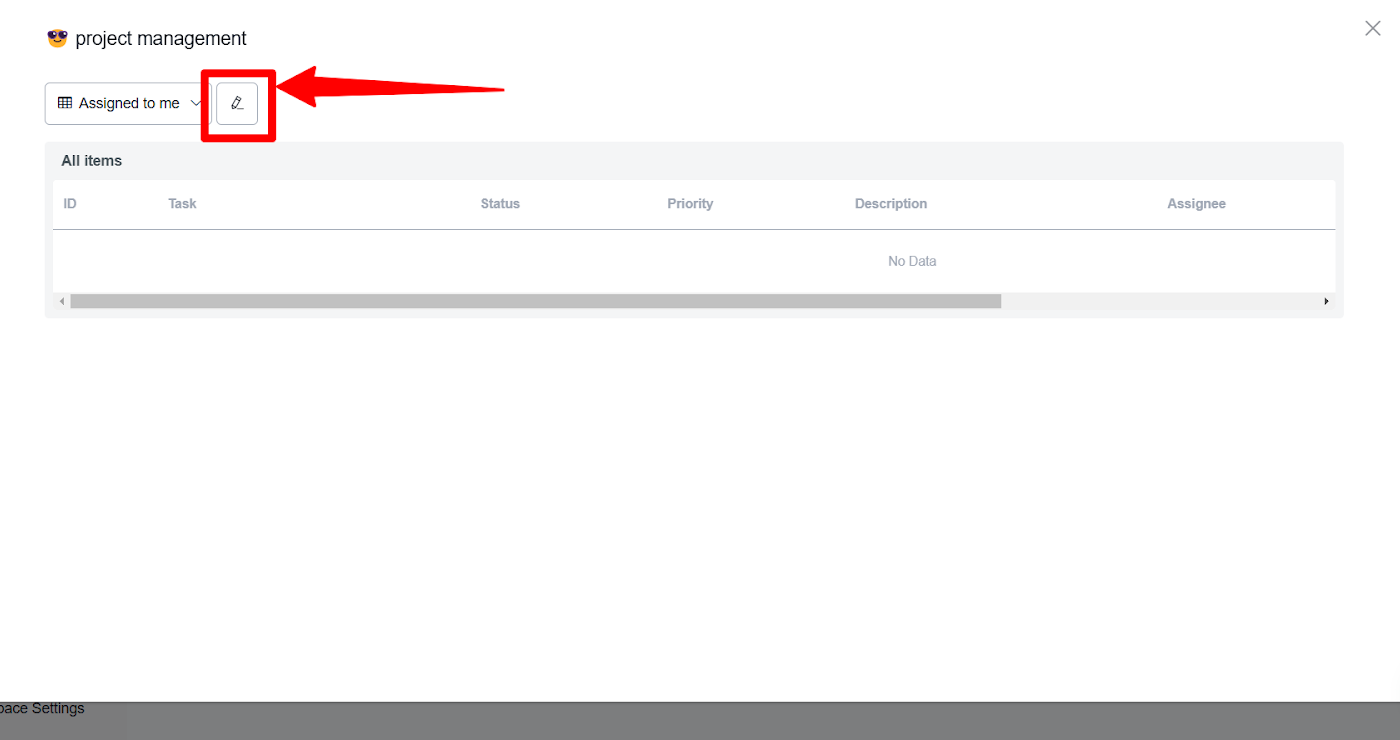
3. Edit the View Settings
Find the specific view (e.g., "Assigned to me") where you want to apply a custom chart title.
Click the Edit icon (pencil icon) to open the Edit View settings for this view.
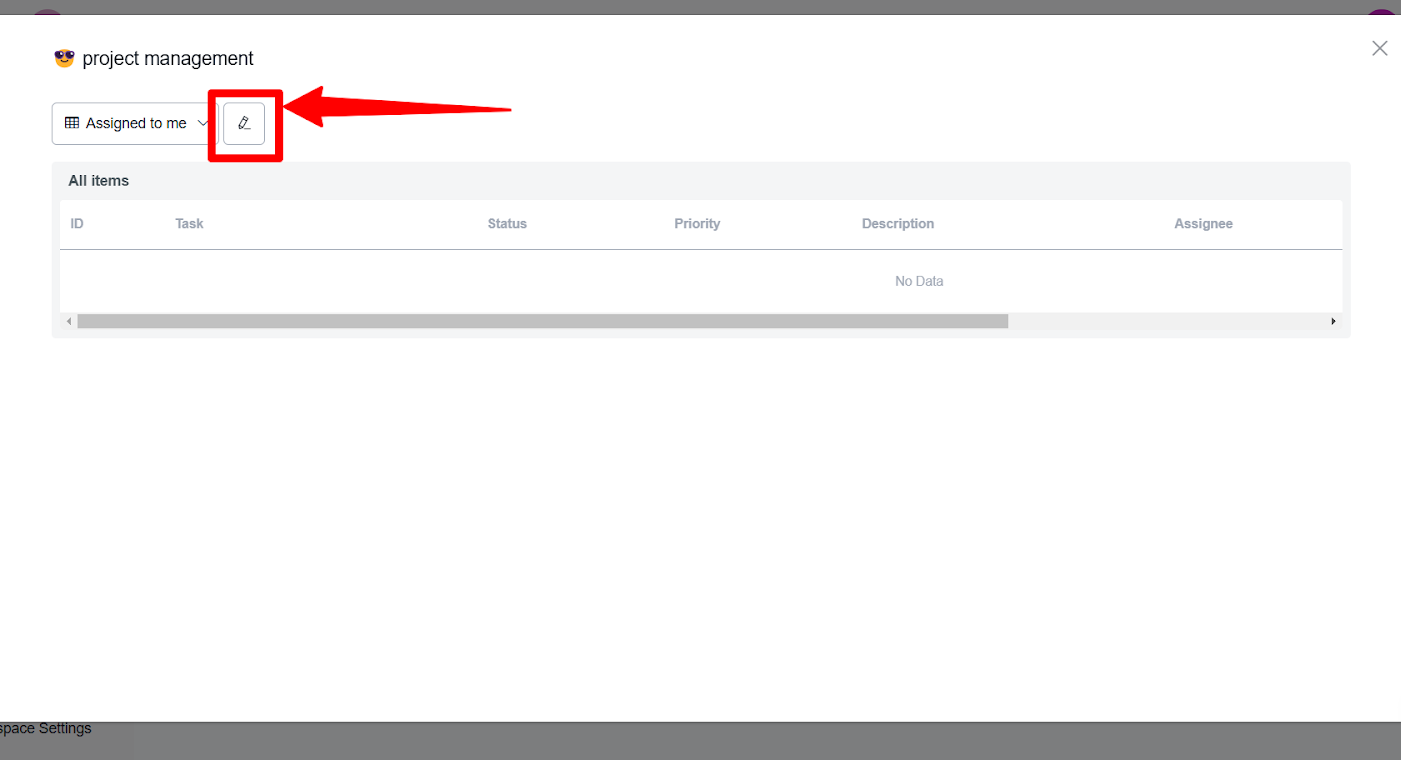
Find the specific view (e.g., "Assigned to me") where you want to apply a custom chart title.
Click the Edit icon (pencil icon) to open the Edit View settings for this view.
4. Choose the Chart Layout
In the Edit View settings, you will see options for layout.
Select Chart as the layout type to enable chart settings.
In the Edit View settings, you will see options for layout.
Select Chart as the layout type to enable chart settings.
5. Configure Grouping (Optional)
Use the Group By dropdown to organize data within the chart based on specific criteria, such as Status or Assignee.
This grouping option helps further structure the data within your custom chart.
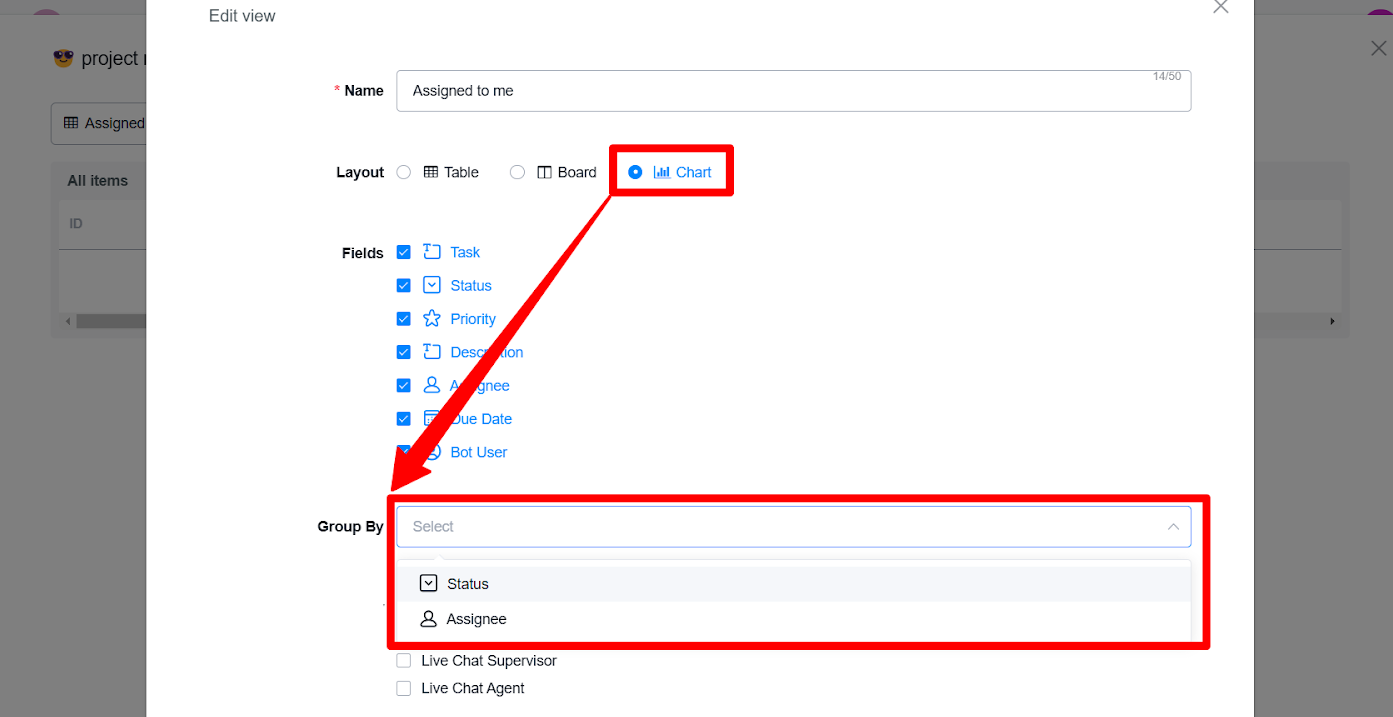
Use the Group By dropdown to organize data within the chart based on specific criteria, such as Status or Assignee.
This grouping option helps further structure the data within your custom chart.
6. Set a Custom Title
In the Current Items Chart field, type in your desired title.
For example, you could use titles like "Open Tickets by Status" or "Tickets Assigned to Me" to match the chart’s purpose.
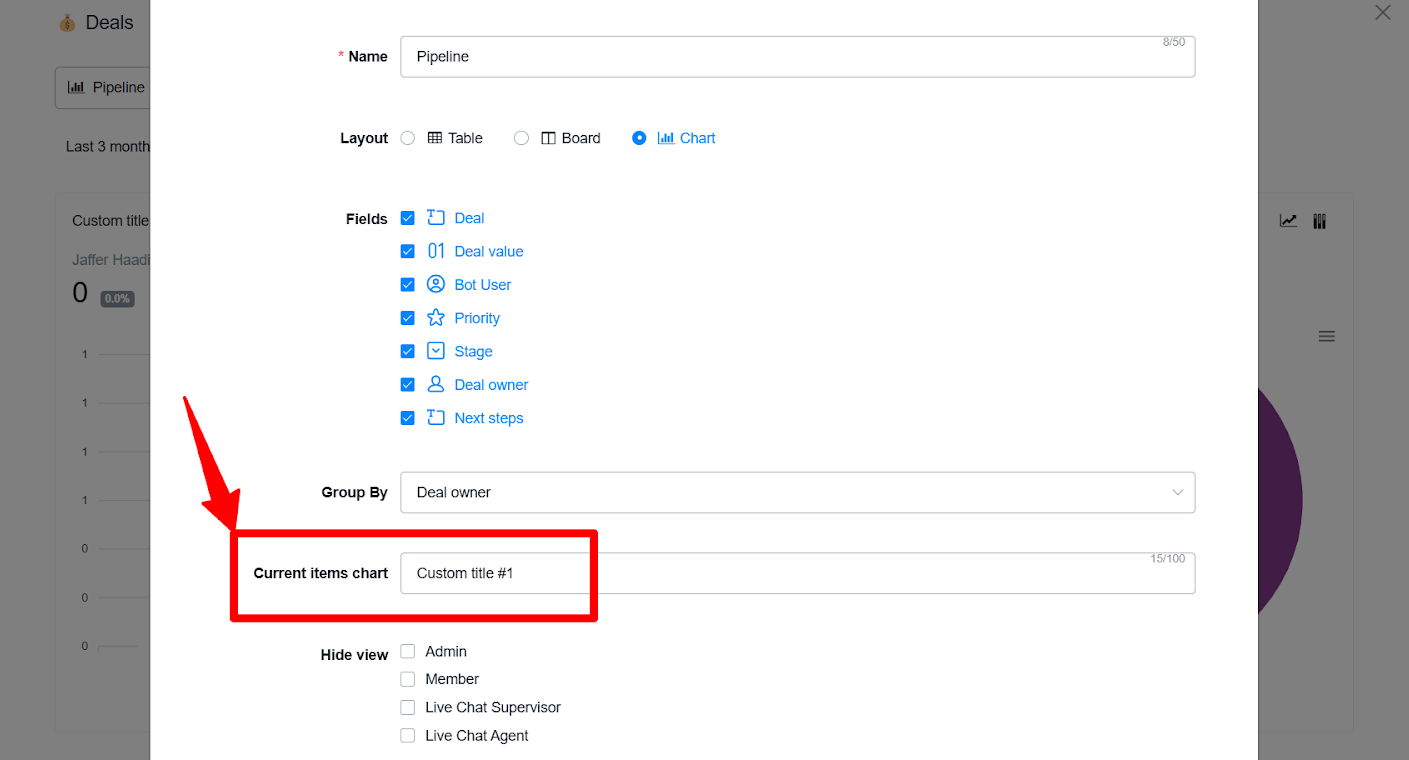
In the Current Items Chart field, type in your desired title.
For example, you could use titles like "Open Tickets by Status" or "Tickets Assigned to Me" to match the chart’s purpose.
7. Apply and Save Changes
Click Save to apply your custom chart title and view settings.
Click Save to apply your custom chart title and view settings.
Repeat steps 5 and 6 for the New Items Chart and Change Logs Chart if you wish to set custom titles for these as well.
8. Checking the Chart Title configured
After setting and saving your chart title, you will be able to see the configured name displayed on the chart. Below is an example:
By following these steps, you should be able to easily customize your chart titles, providing a more informative and professional visual experience for your users when they are using the Tickets Feature.
Group by Agent Type and Rating Type Fields in Ticket List
You can group your tickets by Agent Type and Rating Type fields in both Table and Board views. This feature allows for better ticket organization, enabling teams to quickly view tickets based on specific agents or rating types, which streamlines support workflows and makes it easier to manage and assess performance.
How to Use:
Go to the ticket list.
Select Edit View.
In the Group By field, choose either Agent Type or Rating Type.
Configure additional settings as needed, then click Save.
Visual Example of Board View with Group by Agents:
Visual Example of Table View with Group by Agents:
This image above demonstrates the new feature, with the option to group tickets by Assigned Agent highlighted.
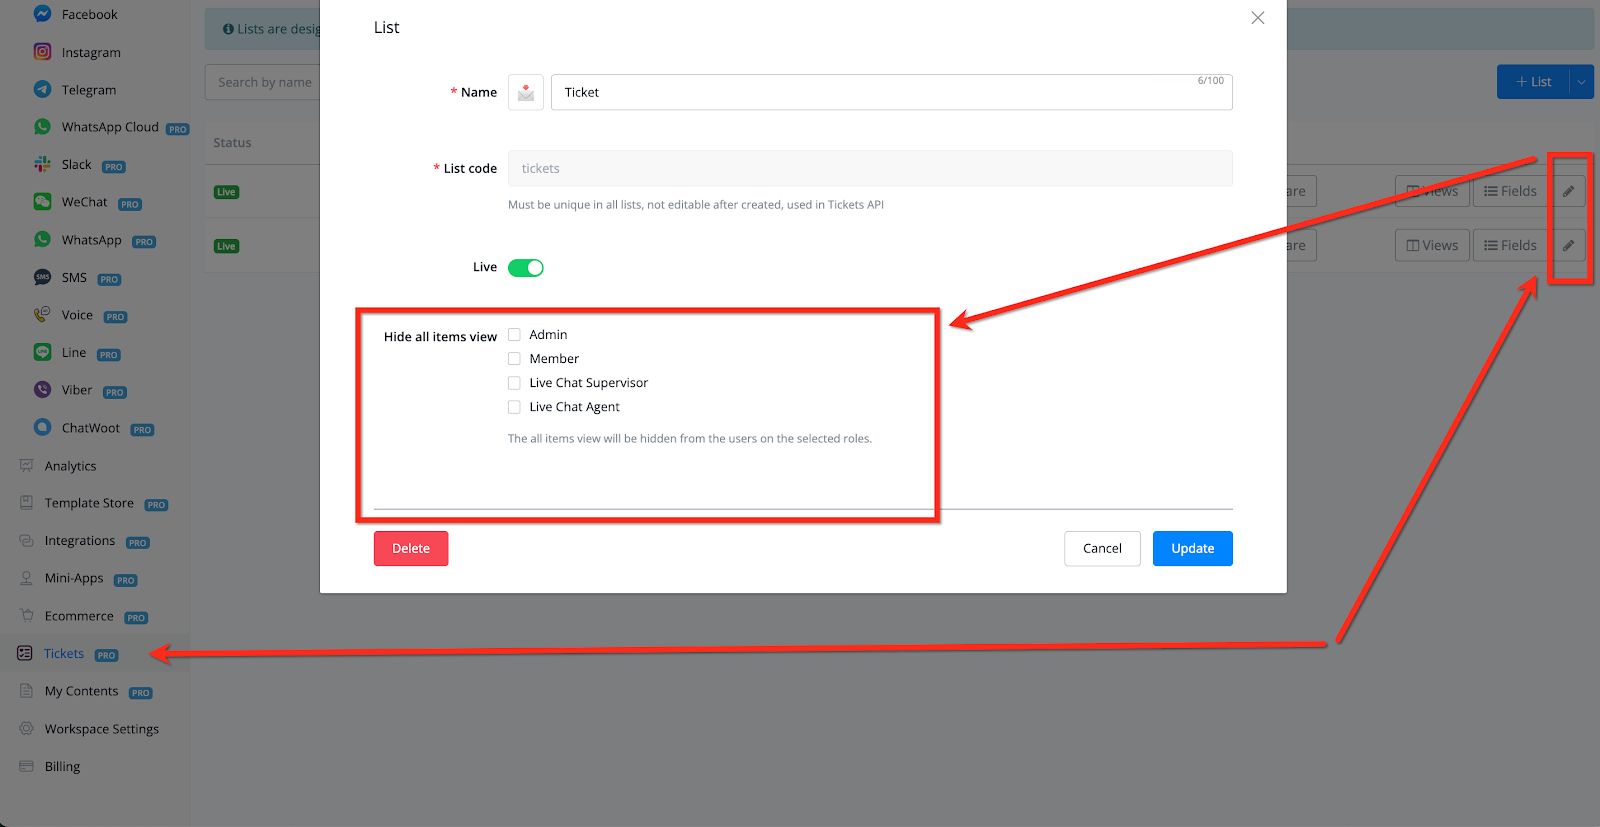
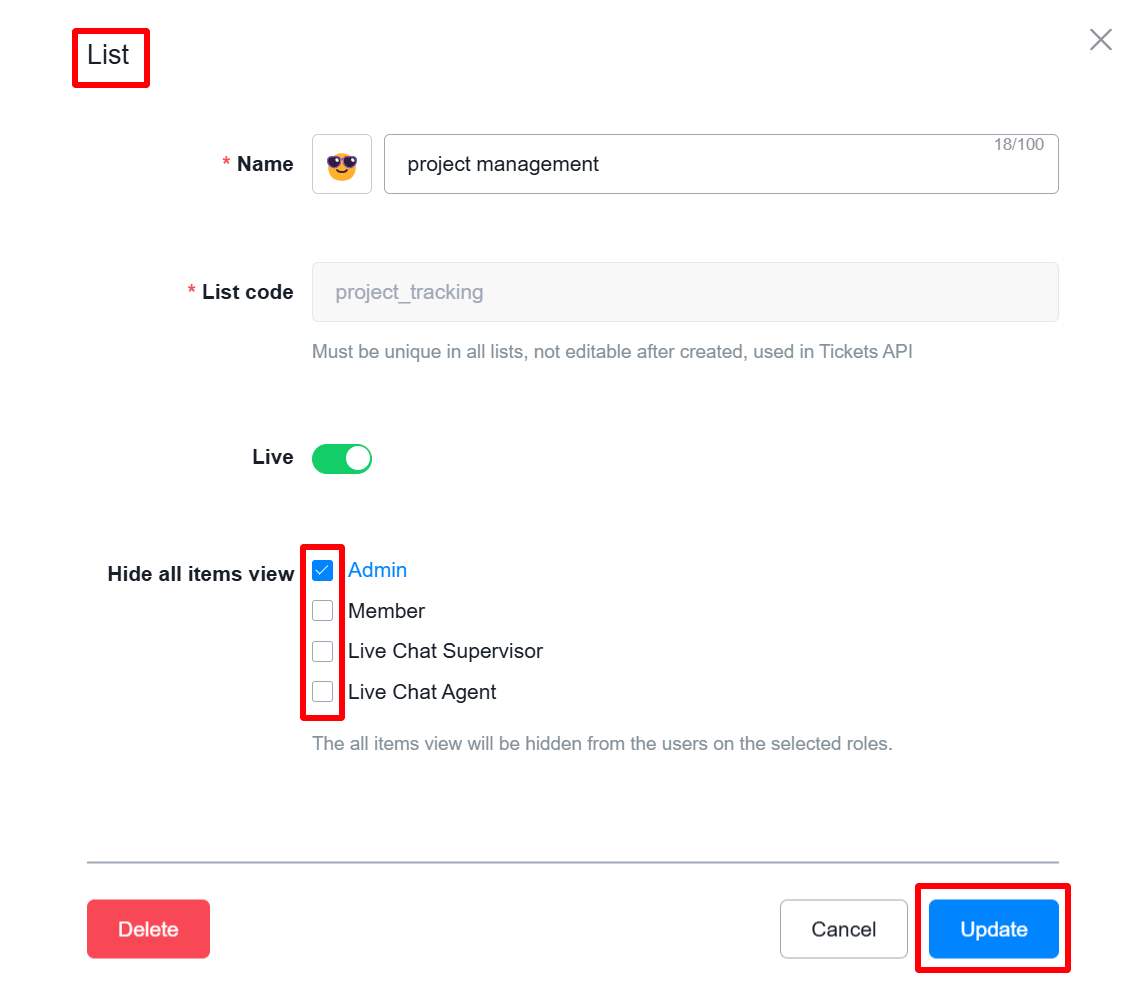
Hiding the “All Items” View
One of the key features in this update is the ability to hide the “All Items” view from specific members. When creating or editing a list, you can choose to limit this view so that only selected roles have access.
For example, if you choose to hide the “All Items” view from an admin, they won’t be able to see the “All Items” view.
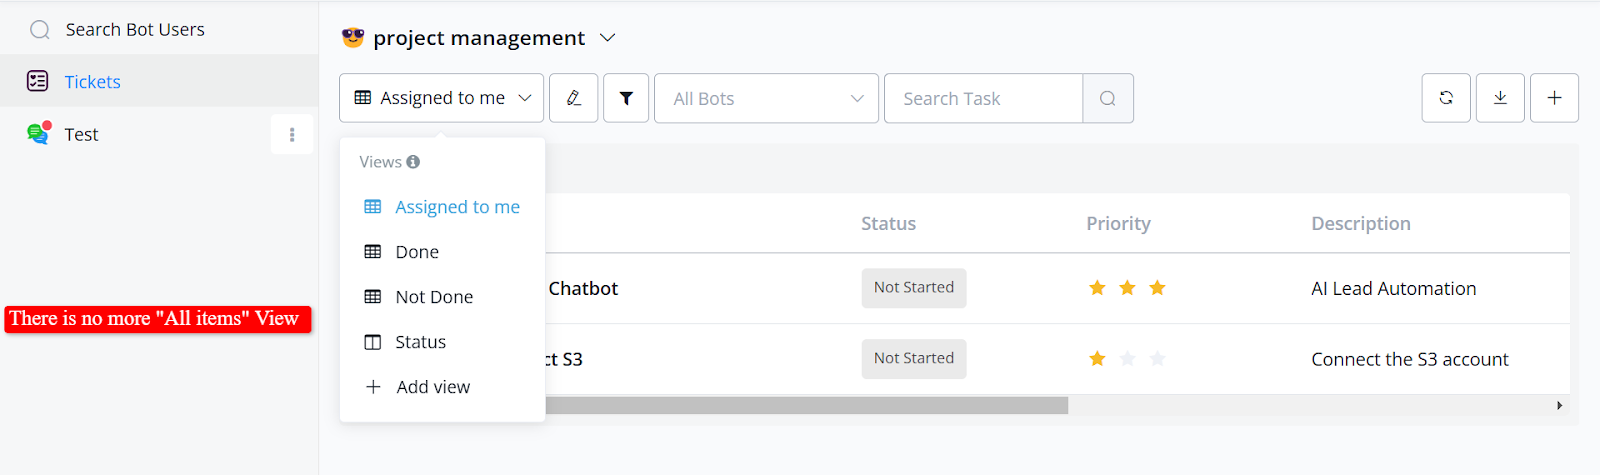
 Now, with the “All Items” view hidden, the designated admin will no longer see a complete list of tickets.
One of the key features in this update is the ability to hide the “All Items” view from specific members. When creating or editing a list, you can choose to limit this view so that only selected roles have access.
For example, if you choose to hide the “All Items” view from an admin, they won’t be able to see the “All Items” view.
Hiding Specific Views
Beyond the “All Items” view, you can also choose to hide other specific views, like “Not Done.”
For instance, if you hide the “Not Done” view from a particular admin, they won’t see tickets that haven’t been completed.
Remember, only owners or admins can set these permissions, so ensure you have the right access level to make these adjustments!
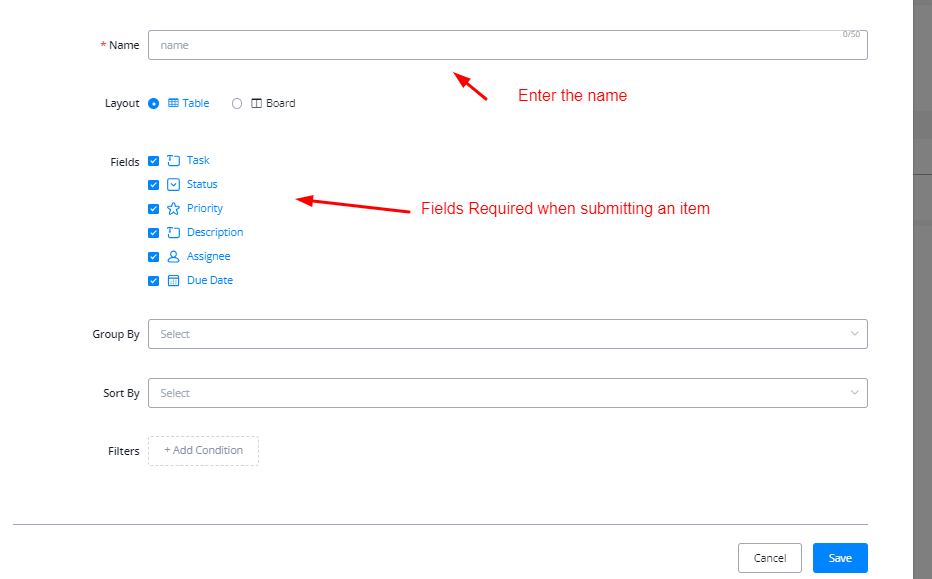
Fields
Fields option allows you to add or remove or mandate a certain fields at the time of adding an item to the list. You can use the pre existing fields as well as available System fields as well as the Custom fields.
This will allow you to mandate any field necessary when adding an item to the list
Following system fields are available currently:
Using Tickets in Livechat
In the livechat, you can open a conversation and add an item to the list from the bot user overview section.
Using Tickets in Flow Builder
You can also create items for the list using “Tickets API” action inside the advanced actions tab of the action node.
Following actions are available:
Lists - Fetches all available lists
List Tickets - Fetches all items available in the list
List Field Options - Fetches all the fields available in a specific List
Create Ticket - Creates and add an item to the list
Update Ticket - Updates an existing item
Get Ticket - Fetches information for a specific ticket
Delete Ticket - Deletes an existing Item
Add Comment - Adds a comment to an existing item
Using Ticket Triggers
You can also utilize the triggers available for the tickets feature, currently we support the following triggers.
You can save the incoming data in a JSON payload and based on the information trigger certain automations.
Ticket API
Enable Tickets Add-on
OCP Users
For Normal OCP users, they can use the following link to pay for the add-on after which they should submit a ticket to support, and the support will enable the feature for their workspace.
Partners
For partners, the add-on is available by default in their partner workspace, for the partner clients, they can enable this addon from the Workspace tab. (Only available for workspaces on paid plan).
To Access this, Whitelabel Settings -> Workspace Tab -> Selected Workspace -> Change Plan.
Related Articles
Line Channel
How to create Line Chatbot Line is the recent addition to OCP channel portfolio. On the OCP dashboard click on the Line channel option available on the left hand side of the screen where all the channels are available. how to access Line Channel from ...Sequences
Use sequences to automatically send follow up / delay messages to customers. You can send multiple messages with different delays. Create Sequence Follow steps 1 to 3 and you will see this: 5 steps to create a sequence: give a sequence name click ...